Author Topic: Scratch build - Mini Cabinet  (Read 10913 times)

Sphere

  • Jr. Member
  • *
  • Posts: 49
    • View Profile
    • Arcade Universe -> Find arcades
Scratch build - Mini Cabinet
« on: August 09, 2015, 10:03:01 PM »
Hey guys,

A while ago I bought a cabinet from Psykick in order to salvage the screen for a friend of mine. Psykick switched the monitors for me and I would take the cab to create some space. The cabinet was in such bad state I disassembled it and wanted to throw it all away but I could not throw away the side panels, they were simple too beautiful... don't you agree?


To be honest it is in terrible shape but I refuse to let this one go to waste and therefore I have decided to revive it and give it a second life. The first plan was to turn it into some artfull lamp but let's face it, such side art should not go to waste. And seeing that I do not want this cab to end up in the hellcade or whatever other crapcab lists the interweb might have I can sure use your help on this as well ;D. It want to make something decent out of it.

There are a lot of scratches, bumps, stickers and dirt on it so I am curious to see what happens when I clean it. Furthermore I am looking to hook up a mame laptop on it. I already have most hardware lying around with the exception of a CP controller. I am still doubting about the screen to either use a CRT or a TFT. I am sure the majority will vote for a CRT and it makes sense as well. I also have wood and smoked plexiglass for the bezel. I want to make the front end with prelaminated black wood from the hardware store and for the feel I might add a coin mechanism (or maybe even connect it to have it work on coins as well). Futhermore I need some new black T-molding all around as this is in poor shape.  

I don't want to make the cabinet too heavy or to big either so I am thinking of making it about 50 cm width (about 20 inch) but I am not sure if that is a nice size for width.

Anyway, this is what I wanted to share for the moment. Currently started the restoration of my Naomi again and want to do this first but of course I cannot wait to get my hand dirty on this baby ;D.

Regards,

Pieter
« Last Edit: January 14, 2017, 02:37:43 PM by Sphere »

anunaki

  • ArcadeLifeStyler'
  • ***
  • Posts: 1432
    • View Profile
Re: Scratch build - revive - Corteggio cabinet
« Reply #1 on: August 09, 2015, 10:22:59 PM »
I like the artwork  :spaceace:

Thwocker

  • ArcadeLifeStyler'
  • ***
  • Posts: 620
    • View Profile
    • Universal Arcade Cabs
Re: Scratch build - revive - Corteggio cabinet
« Reply #2 on: August 09, 2015, 10:26:15 PM »
work of art!

the Toy Museum collection in Mechelen had this listed as D-Day by Olympia:

http://soc.kuleuven.be/onderwijs/pop/videogames/museum.php
Wanted: everything Universal , Stern and Gottlieb. Currently looking for Computer R3, Curve Ball, Goal to Go, Jungler, Fast Draw, Limbo, No Man's Land and Speed Coin.

Sphere

  • Jr. Member
  • *
  • Posts: 49
    • View Profile
    • Arcade Universe -> Find arcades
Re: Scratch build - revive - Corteggio cabinet
« Reply #3 on: August 09, 2015, 11:59:32 PM »
work of art!

the Toy Museum collection in Mechelen had this listed as D-Day by Olympia:

http://soc.kuleuven.be/onderwijs/pop/videogames/museum.php

Funny that you found that, I remember some details of the cab in that picture actually. I thought that it was more a mix & match kind of cabinet. And when I googled the signature on the side art I actually came across this: http://www.arcade-history.com/?n=born-to-fight&page=detail&id=3692

It appeared to be part of a game called "Born to fight". Looking at both games and then matching it with the side art both games would fit. So I am a bit lost although I tend to lean to the D-day game tbh.

Laszo

  • ArcadeLifeStyler'
  • ***
  • Posts: 993
  • Building
    • View Profile
Re: Scratch build - revive - Corteggio cabinet
« Reply #4 on: August 10, 2015, 12:39:42 AM »
It is an olympia dday. I got one that I want to get working again. Any change you still have parts like the original cp, wiring, pcb's?

Sphere

  • Jr. Member
  • *
  • Posts: 49
    • View Profile
    • Arcade Universe -> Find arcades
Re: Scratch build - revive - Corteggi cabinet
« Reply #5 on: August 10, 2015, 01:05:36 AM »
Not sure. What I bought was the outer shell including a monitor. I only remember the front camo style part of the control panel. I saved the back handles and cp clamps and I also believe I have the wiring but there is no guarantee that it is actually from this cab to be honest. I could make some pictures for you if you like?

Sphere

  • Jr. Member
  • *
  • Posts: 49
    • View Profile
    • Arcade Universe -> Find arcades
Re: Scratch build - revive - Corteggi cabinet
« Reply #6 on: August 11, 2015, 09:00:57 PM »
Alrighty, I've had some thought about this and what I wanted to do is have a light, easy to handle and a smaller version this cab so I was thinking of resizing the complete cab to actually fit it in my attic without any problems. Now this comes with some complications namely:

1) Will a resize actually look nice?
2) A complete resize is impossible as I want to save the artwork but also the general shape of the sides that I already have.

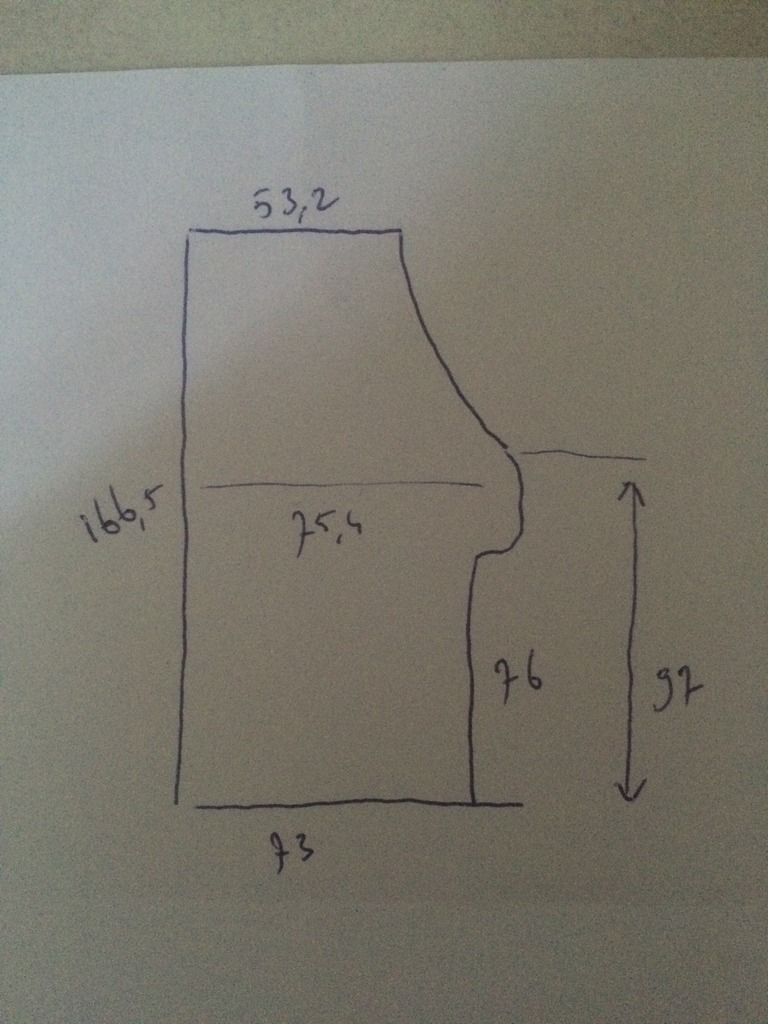
So here are the current dimensions:


And this is what I have been thinking of as a resize. Each side has 2 values in which the left value represents 73% of the original size and the right value represents 85% of the original size. The red line is the arched part of the cab that will not be resized:


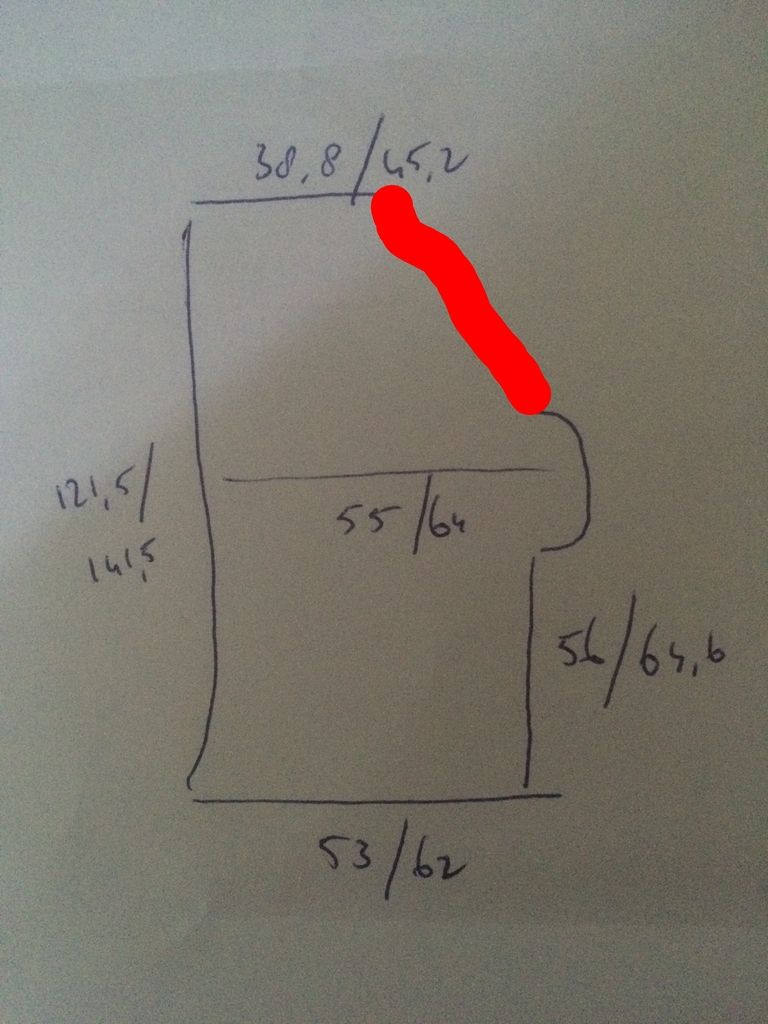
The width of the cab will also be resized according to the same ratio.

Looking at a nice size I would actually go for the 85% resize however that raises the CP by almost 9 cm's compared to sit down cabs and that might be too high to sit behind it and too low to stand. That would mean I need to take more off from the bottem but then I am afraid the ratio's will not look nice. Any thoughts on this other than leaving it in its original size?

The other question is the angle of the screen, what would be the ideal gaming angle?

ckong

  • ArcadeLifeStyler'
  • ***
  • Posts: 3177
  • The Netherlands
    • View Profile
Re: Scratch build - revive - Corteggi cabinet
« Reply #7 on: August 11, 2015, 10:06:08 PM »
This will be a very nice project, I love the side art.

It's difficult to establish a suitable size from a piece of paper, maybe you could try to make a 3D model in some CAD program? Or you know someone who could do that for you? Then you can get a good idea about model and sizes.

CRT or TFT? I never heard of the latter! LOL  Please go the CRT route, you could use a secondhand CRT TV, which are very cheap nowadays.

Regarding Mame, which build are you planning to use? I can recommend Groovymame. And horizontal or vertikal? Or rotatable?

Please keep posting lots of pictures, we love them.


Laszo

  • ArcadeLifeStyler'
  • ***
  • Posts: 993
  • Building
    • View Profile
Re: Scratch build - revive - Corteggi cabinet
« Reply #8 on: August 12, 2015, 12:29:16 AM »
Not sure. What I bought was the outer shell including a monitor. I only remember the front camo style part of the control panel. I saved the back handles and cp clamps and I also believe I have the wiring but there is no guarantee that it is actually from this cab to be honest. I could make some pictures for you if you like?

Would be great, mine got a non original standard cp in it. On the flyer it has this camo part with I think a backfolded controlpanel. Very interested to see what you got.

Laszo

  • ArcadeLifeStyler'
  • ***
  • Posts: 993
  • Building
    • View Profile
Re: Scratch build - revive - Corteggi cabinet
« Reply #9 on: August 12, 2015, 12:44:05 AM »
Finding the right resize is hard, maybe make a cardboard model first to see which size you like.

Sphere

  • Jr. Member
  • *
  • Posts: 49
    • View Profile
    • Arcade Universe -> Find arcades
Re: Scratch build - revive - Corteggi cabinet
« Reply #10 on: August 15, 2015, 12:13:59 PM »
Laszo, you are a lifesaver!

This is what I have made this morning and found a flaw in my resize calculation because if I resize everything besides the screen angle I need to take into account a double resize of the bottum length where you feet are and as a consequence it becomes a sit down cab with an oversized screen even though the resize was only to 85%:


My conclusion is that resizing to 85% is ok but I feel the monitor look is now oversized. Looking at the size I am considering cutting a part from the top so the ratio of the screen size vs the overall size is almost back to normal again. That would actually make the cab look more normal and simply smaller (I hope).


Sphere

  • Jr. Member
  • *
  • Posts: 49
    • View Profile
    • Arcade Universe -> Find arcades
Re: Scratch build - revive - Corteggi cabinet
« Reply #11 on: August 15, 2015, 12:19:05 PM »
This will be a very nice project, I love the side art.

It's difficult to establish a suitable size from a piece of paper, maybe you could try to make a 3D model in some CAD program? Or you know someone who could do that for you? Then you can get a good idea about model and sizes.

CRT or TFT? I never heard of the latter! LOL  Please go the CRT route, you could use a secondhand CRT TV, which are very cheap nowadays.

Regarding Mame, which build are you planning to use? I can recommend Groovymame. And horizontal or vertikal? Or rotatable?

Please keep posting lots of pictures, we love them.

I like to remain flexible so there needs to be some form of rotating mechanisme which should not be such a problem as I made one before in my candy cab. With CRT screens it is a bit more difficult but with TFT that is easy. I will first install my TFT but I agree with you that CRT would be a hell of a lot sweeter and not expensive at all.

I am not familiar with MAME at all so I am looking for something easy but workable. I have worked with the original MAME interface and it sucks when you have more games than can be displayed on the screen. I just want software that shows an easy menu in which you can select your games, that is it. I will look ito Groovymame, thanks for the tip.

Laszo

  • ArcadeLifeStyler'
  • ***
  • Posts: 993
  • Building
    • View Profile
Re: Scratch build - revive - Corteggi cabinet
« Reply #12 on: August 17, 2015, 08:59:00 AM »
Make sure that you have enough space to place a crt. They are always more bulky then expected. Based on the current screen angle I think you could run into trouble!

Sphere

  • Jr. Member
  • *
  • Posts: 49
    • View Profile
    • Arcade Universe -> Find arcades
Re: Scratch build - revive - Corteggi cabinet
« Reply #13 on: January 14, 2017, 02:37:00 PM »
As you might have noticed this project was abandoned by my for a while. The reason being is that I could not put a saw in the beautiful art in the end. Although it is pretty banged up I still want to preserve it. It seems I am getting some more time now to do another project so I want to pick this up again but I want to scratch build a mini. A while back I spoke to a person that restored a cab which I fell in love with instantly and that is the one I want to miniaturize. Problem is that I do not have the dimensions and could use some help with that.

This is the cab:


This cab was produced by Model Racing SPA Mini Cabinet (bad name for a cabinet as it is difficult to find any information on Google about it). The control panel on the picture is not original but I just love the looks, angles and colors of this cab.

So back to my question, does anyone happen to have the dimensions of this cab or of simular cabs?

Thanks for any help!

Pieter
« Last Edit: January 14, 2017, 02:39:52 PM by Sphere »

Arch

  • Member
  • **
  • Posts: 250
    • View Profile
Re: Scratch build - Mini Cabinet
« Reply #14 on: January 18, 2017, 11:34:38 PM »
I can help you with the dimensions, as the cabinet in the picture is mine. :)

You are wrong about the control panel not being original, although it is painted and hacked to use a spinner. I think I might have a picture of how it looked before on an old harddisk.

Get in touch with me by PM, and I'll try my best to help you out.
All I wanted was a Pepsi!
Currently looking for an original Wonderboy PCB.