Author Topic: Atari Fire Truck Restoration. 24/02/14 *Resto Complete*  (Read 24736 times)

anunaki

  • ArcadeLifeStyler'
  • ***
  • Posts: 1432
    • View Profile
Re: Atari Fire Truck Restoration. 05/09 Rear seat Complete
« Reply #15 on: September 05, 2013, 09:54:53 PM »
holy malony :shock:

great work :spaceace:

level42

  • ArcadeLifeStyler'
  • ***
  • Posts: 13555
  • Ridderkerk, arcade capital of Europe !
    • View Profile
    • Arcade 42
Re: Atari Fire Truck Restoration. 05/09 Rear seat Complete
« Reply #16 on: September 05, 2013, 11:12:49 PM »
Looks totally awesome !!!

Laszo

  • ArcadeLifeStyler'
  • ***
  • Posts: 993
  • Building
    • View Profile
Re: Atari Fire Truck Restoration. 05/09 Rear seat Complete
« Reply #17 on: September 06, 2013, 02:34:15 AM »
Sssssssssweet  8)

smarty

  • Jr. Member
  • *
  • Posts: 99
  • Hampshire, UK.
    • View Profile
    • Jumpnfire.com
Re: Atari Fire Truck Restoration. 13/10 Main Cab and Gas pedal
« Reply #18 on: October 09, 2013, 10:53:02 PM »
03/10/13 Fire Truck. Main cab, Work begins...

Moving on from the rear seat, its time to get the main cab on the road so it can put out some fires! Work carried out so far in no particular order.

1. Cab stripped out of all components and thoroughly cleaned.
2. New Leg levellers fitted and the cab had none, no doubt this had caused some of the damage around the bottom of the cab.
3. Laminate sides glued back on.
4. Small repair to a bottom section of the cab that broken off.
5. New T-Moulding fitted.
6. Top and rear section of cab re-fitted back into place with glue and original nails.
7. New power switch fitted as the last one had been home to some wasps and I think they ate most of it!
8. Wire loom had a bath and some new connectors fitted as the plastic had become brittle and snapped off the locking lugs.
9. Power brick stripped and cleaned. All five fuse holders replaced as the old ones had gone brittle, both the internal metal and the plastic cases broke off when opening the holder to check the fuses.
10. Steering assembly stripped and cleaned.

Time for some photos...


Empty cab full of grime.


All the innards.


I thought about taking the whole cab to bits but decided against it!


After a clean up with paint on the transformer and new fuse holders


Damage to the laminate side. New screws adding strength to the base.


More T-Cut applied to clean the sides.


Steering assembly stripped for maintenance.

There's plenty more to do but things are moving on nicely, more soon.


09/10/13 Fire Truck. Gas pedal clean up.

Small update from my last few evenings work...

The gas pedal on the cab looked in a pretty bad state, plenty of wet shoes and cold storage had caused the surface of the pedal to to turn a lovely glowing rust colour. I wasn't sure if I would need to spray this black to 'hide' any damage but as things got this has turned out nice :)
The metal backing plate was also sanded back, primed and sprayed in black, I with I had shares in black spray paint as I have used lots of it in the past year or so.


Pedal ass'y as found on the cab


Eek! elbow grease required, anyone got some!


A good bit of cleaning and polishing later...


Gripped up, with metal plate sprayed. Mmmm.

That's all folks! Only a quick update as time permits, the next update will hopefully be of the cab cosmetics complete, minus the monitor which will require a lengthy post as I've got some work to do retrofitting an LCD monitor ;o) a CRT monitor to replace the missing 23" Black and White which would have originally been installed.

Thanks, Mart.
« Last Edit: October 10, 2013, 01:58:16 PM by smarty »
www.jumpnfire.com

MOST WANTED CABS:

level42

  • ArcadeLifeStyler'
  • ***
  • Posts: 13555
  • Ridderkerk, arcade capital of Europe !
    • View Profile
    • Arcade 42
Re: Atari Fire Truck Restoration. 13/10 Main Cab and Gas pedal
« Reply #19 on: October 09, 2013, 11:33:37 PM »
Very nice but could you use a bit bigger pictures ? They're so tiny, and I'm old ;)

smarty

  • Jr. Member
  • *
  • Posts: 99
  • Hampshire, UK.
    • View Profile
    • Jumpnfire.com
Re: Atari Fire Truck Restoration. 13/10 Main Cab and Gas pedal
« Reply #20 on: October 10, 2013, 01:58:58 PM »
...could you use a bit bigger pictures ? They're so tiny, and I'm old ;)

Done.

Still living in the '90's thinking posting a photo above 640x480 is bad web etiquette. :) All photo's in this thread are now larger.
« Last Edit: October 10, 2013, 02:04:39 PM by smarty »
www.jumpnfire.com

MOST WANTED CABS:

smarty

  • Jr. Member
  • *
  • Posts: 99
  • Hampshire, UK.
    • View Profile
    • Jumpnfire.com
Re: Atari Fire Truck Restoration. 3/11 1st Power up
« Reply #21 on: November 03, 2013, 08:08:31 PM »
Fire Truck. 1st power up
Well after the game board came back from repair, I couldn't hold off and wait for everything else to be completed so decided I needed to power it up and see what would happen...

The video is a genuine 1st power up once everything was plugged back together:

http://youtu.be/cihTlt3UVis

It turned out pretty successfully, with only a couple of LED's on the Control Panel buttons having failed, I have since swapped these out with some working ones, the image from the monitor is poor in the video but I can assure you that's a temporary measure and will be rectified in the future before I declare the cab to be complete.

The rubber matting was completed when I made my last post, but I forgot to add a photo.


Since the above video was made I have put a 19" temporary video monitor in the cab and have been busy play testing it.  :)


I have also fitted a 'non invasive' credit button which is activated by using the coin reject button on one side of the coin mech. The left side is for 'free' credits and the right side still take 25 Cent coins. I've also fitted a bulb holder to replace the one that had been cut off so the 25 cent sign is now illuminated.


After having some fun playing I decided to have a look at the monitor mounting framework that was part of the original monitor. It turns out that some woodwork was missing from the cab, I made a new part and fixed it to the cab, which is highlighted in the image below.


The monitor (that I don't currently have!) will now sit in a wooden framework that attaches to the two pieces in the image above.

Sorry for the slow progress, I'd have liked this resto to have been finished a while back but I've wasted a few days trying to get some colour monitors to work unsuccessfully with the game, I really need an original black and white CRT if anyone has one laying around spare?

Next time... The cab will be completed. Remaining items to completion are as follows:

Find, fit and test a suitable monitor.
Make a new back door for the main cab, paint it or cover it in black vinyl.
Make a cardboard monitor bezel to fit the cab.
Fit locks to the main coin door and the back door.

Once the above are complete I'll make another, better produced video and post up some quality photos of the finished cab.

Until next time, thanks for reading, Mart.
« Last Edit: November 03, 2013, 08:17:02 PM by smarty »
www.jumpnfire.com

MOST WANTED CABS:

ataritoobin

  • Member
  • **
  • Posts: 410
    • View Profile
Re: Atari Fire Truck Restoration. 3/11 1st Power up
« Reply #22 on: November 04, 2013, 05:40:50 PM »
I have also fitted a 'non invasive' credit button which is activated by using the coin reject button on one side of the coin mech. The left side is for 'free' credits and the right side still take 25 Cent coins. I've also fitted a bulb holder to replace the one that had been cut off so the 25 cent sign is now illuminated.


Love it!  :spaceace:

smarty

  • Jr. Member
  • *
  • Posts: 99
  • Hampshire, UK.
    • View Profile
    • Jumpnfire.com
Re: Atari Fire Truck Restoration. 11/11 TV/ Monitor
« Reply #23 on: November 11, 2013, 07:39:58 PM »
Fire Truck. Pye update.

Well after being tipped off on the Jamma+ forums that a Black and White TV made by Pye had gone unsold on Ebay, I made no hesitation in getting in touch with the seller and striking a deal. After a 100 mile round trip one evening this week I had an 'untested' monitor which seemed to suit FT's needs.

It's a 23" screen, had already been modified with a composite video and audio circuit (not that I need the audio) and it has no screen burn, things were looking good!


Crappy photo but this is the TV

First thing first, there was no fuse in the plug, an easy fix but I did wonder why it wasn't fitted, next up was to remove the back cover and see what was inside.


Back cover removed

Well nothing on the inside looked smoked or burnt, there was a bit of cable hackery going on for the extra circuit that been added, after 10 mins of checking the connectors were all seated, I plugged in a video feed from Fire Truck into the input on the back of the case, made sure it was switched to video input and powered up...


First power up with FT's video input

Well it was a good start, you cant tell from he image above but the image was rolling in horizontal and vertical directions. So at this point I powered off the monitor and discharged the tube, I needed to see what adjustments were going to be available to help me fix this issue. There were a few adjustable variable resistor's on the board but from the component side there were no markings as to what the were for, a bit more luck... on turning the board over to solder side there were some nice markings on the underside depicting what they should do.


So after tentatively making these adjustments which the chassis back in place, I got a good solid image which filled the screen nicely. The next job was to de-case the screen and remove all the unnecessary bits which I didn't want cluttering up the cab.
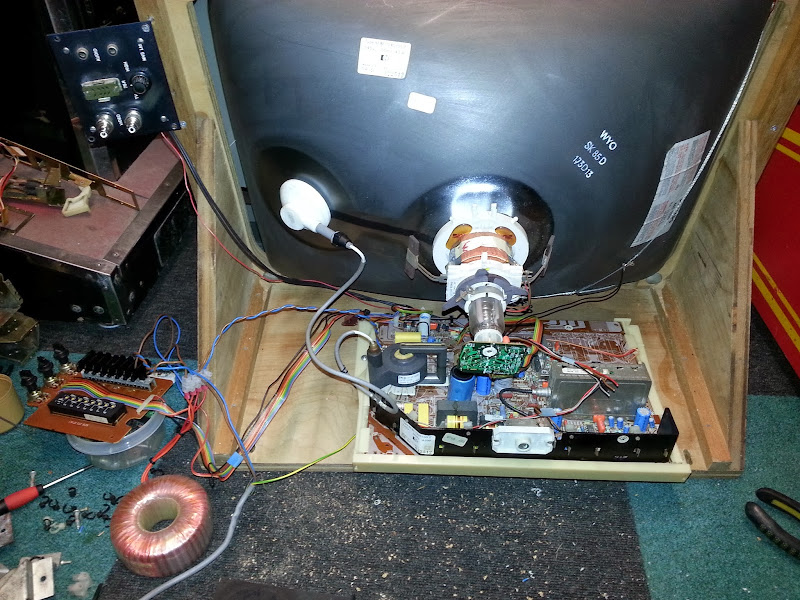

TV innards removed


Tube mounted in Original Atari frame and Pye TV chassis mount attached.

At this point I decide that I would power up the screen with the parts loose fitting and try and work out what parts I could remove to leave the chassis as lean as possible in terms of parts. This is an arcade machine and doesn't need to that tuning dials still attached.


Mains transformer, video input board, and tuning dials laid loose to test


Mains transformer mounted, tuning dials gone, video board in process of being remounted

I was now in a position where the tuning dials were gone and I had removed the brightness and contrast adjusters from the original circuit and traced their wiring so they could be re-soldered onto a mounting plate that needed to now make.


Video board with brightness & contrast being wired in


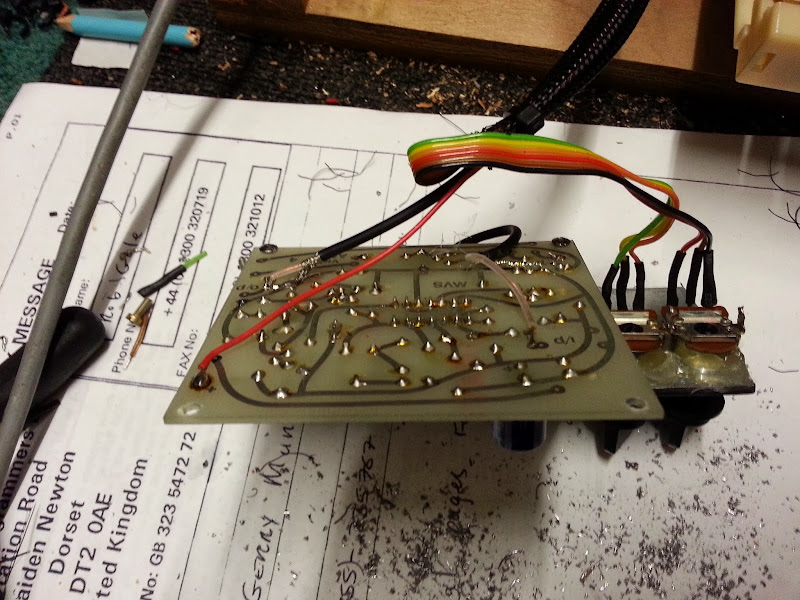
Video board all mounted

In the photo above the red wire is powering the video amplifier board, the left side mini coax is the video output which is wired directly onto the chassis circuit board, the other mini coax is he video input from a BNC connector which I mounted on the plate below the PCB with the brightness & contrast adjusters.

After a few evenings work this is how it turned out, I'm very happy with how minimal it became considering it was once a TV sitting in someone's front room no doubt.


Completely remounted.

Here's the parts left from the original TV


Leftover Pye...Case, audio amplifier, tuning dials, speakers and some wire
And finally...Mounted in the cab, and powered up :o)


The way it was meant to be played! 23 inches of black & white magic

Thanks must got to Tony (tb2000) for making me aware of this screen, the seller for not binning it when no one bid on the auction, This has been a great week for me and the FT cab, the Karma gods have finally paid me back after what feels like a long absence.

Next time will end the rebuild with a new back door, locks and monitor bezel. Until then thanks for all the comments, its been great to have such enthusiasm for the cab shown. I'm looking forward to completing this now getting lots of plays on it, initial testing has put a smile on my face for sure!
www.jumpnfire.com

MOST WANTED CABS:

level42

  • ArcadeLifeStyler'
  • ***
  • Posts: 13555
  • Ridderkerk, arcade capital of Europe !
    • View Profile
    • Arcade 42
Re: Atari Fire Truck Restoration. 11/11 TV/ Monitor
« Reply #24 on: November 11, 2013, 08:33:29 PM »
Excellent !!!!  ;D ;D ;D ;D

What an honor for such on old humble TV to get a brand new future like that !  ;D ;D ;D ;D

Etienne MacGyver

  • ArcadeLifeStyler'
  • ***
  • Posts: 7611
  • The Netherlands
    • View Profile
Re: Atari Fire Truck Restoration. 11/11 TV/ Monitor
« Reply #25 on: November 11, 2013, 08:43:58 PM »
Love every bit of it !  :spaceace: :spaceace: :spaceace:

scr33n

  • ArcadeLifeStyler'
  • ***
  • Posts: 1674
    • View Profile
Re: Atari Fire Truck Restoration. 11/11 TV/ Monitor
« Reply #26 on: November 11, 2013, 08:45:38 PM »
 :spaceace: :spaceace:
PROJECTS FROM SCRATCH:

Galaga - PacMan - Donkey Kong Red Cab - Track & Field Upright - Tempest - Burgertime - Gyruss - Defender - Track & Field Cocktail - Robotron 2084

RESTORATIONS:

Q*bert - Timber

level42

  • ArcadeLifeStyler'
  • ***
  • Posts: 13555
  • Ridderkerk, arcade capital of Europe !
    • View Profile
    • Arcade 42
Re: Atari Fire Truck Restoration. 11/11 TV/ Monitor
« Reply #27 on: November 11, 2013, 09:13:10 PM »
And it's a Philips tube too :) (Looks Philips owned PYE at the time this TV was manufactured. I bet it's a Philips TV outright....not a bad sign ;)


smarty

  • Jr. Member
  • *
  • Posts: 99
  • Hampshire, UK.
    • View Profile
    • Jumpnfire.com
Re: Atari Fire Truck Restoration. 24/02/14 *Resto Complete*
« Reply #28 on: February 24, 2014, 10:46:39 PM »
I know I'm not a big poster here, not that I am anywhere, but I hope you like my final update to my Fire Truck project.  :)

Fire Truck. Racing to the Fire's

Well this is going to be the last update in the foreseeable future of my Fire Truck. It is now as complete and working as I want it to be, but there are a few items that I will come back to in the future when space and time permits. I would really like to remake the top cab panel and the two rear sections above and below the back door position. Theses parts are made of chipboard and have become slightly swollen, I'd like to replace them with MDF as I have with the new rear door and cover them in some black vinyl, similar to what was originally fitted. All the wooden edges would then line up and really top the cab off, but I'm restricted with space and now being winter I cannot work outside on the cab.

Anyway below is a photo of the rear cab with all the monitor wiring complete, I tapped the 240 volts for the monitor from one side of the interlock switches so it now essentially getting its power direct from the mains input when the interlock switches are closed and the cab is turned on.


After being happy with the cab innards, It was time to make a back door to replace the rotten one that came with the cab. It had a big section missing and was in a really poor state. The main door is a single piece of MDF cut to size, with a small section which holds it in place at the bottom.


Backdoor cut, lock hole drilled and edges sprayed

I was going to cover the door with some adhesive vinyl, but after seeing how the spray looked decided to cover the whole panel in spray and leave it at that for now. As you can see below the lock is fitted and the original Atari Information sheet was re-stapled to the inside of the door.


Backdoor complete

This next shot is a big of a tight angle but shows the door locked in place on the cab.


Backdoor fitted to cab

As mentioned above at some stage in the future I will replace the woodwork above and below the door along with the piece on the top of the cab.

The final piece of work needed to finish the cab off was to make a cardboard monitor surround. Even though my cab didn't have one, Phil who sold me the cab had one from the other Fire Truck cabs, so he lent it to me so I could make some replacements.

This was done using some heavy duty card from the Hobby Craft chain of shops and was carefully cut using multiple sharp blades, I disassembled the original monitor surround, drew round the pieces, cut them out and made the folds where necessary, finally I used hot melt glue to hold it all together.


Old bezel ready for templating


New pieces cut


Did I mention I made three of these today :)


My bezel, glued ready for fitting in the cab


New sticker with part Atari part number and a new custom revision.


In the cab. Nice!


Plexi glass installed, slight Vertical sizing adjustment need to be made.

Finally a few shots of the cab taken with a real digital camera and not my mobile phone.


Thanks for reading, and a bigger thanks go to Phil for letting me have one of the three cabs he picked up all those years ago.

FT-394 is ready to be played...

Enjoy, Mart.
www.jumpnfire.com

MOST WANTED CABS:

level42

  • ArcadeLifeStyler'
  • ***
  • Posts: 13555
  • Ridderkerk, arcade capital of Europe !
    • View Profile
    • Arcade 42
Re: Atari Fire Truck Restoration. 24/02/14 *Resto Complete*
« Reply #29 on: February 24, 2014, 10:51:25 PM »
If that doesn't make any Atari/Arcade fan's heart beat faster than I don't know anymore......


LOVE IT !!!!