OK, following this thread:
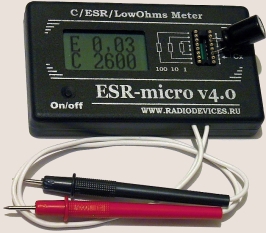
https://www.dragonslairfans.com/smfor/index.php?topic=2597.0here is my review of the ESR Micro V4.0 ESR and C meter.
I will nog go into the depths of the technical history behind this (kind of) meter. You can read a lot about it right here:
http://members.ozemail.com.au/~bobpar/esrtext.htmand here are the original (Dick Smith) and comparable devices:
http://members.ozemail.com.au/~bobpar/esrmeter.htmI can't seem to find it now, but while surfing through these pages I found a link about a Russian built version that was quite interesting (this was even before I saw the Peak version).
This was the Russian site:
http://www.radiodevices.ruNow, my Russian is slightly less than my French, so I coulnd't read a word. Thanks to the wonders of Google translate though, it turned into something I could understand:
http://translate.google.nl/translate?sl=ru&tl=en&js=n&prev=_t&hl=en&ie=UTF-8&layout=2&eotf=1&u=http%3A%2F%2Fwww.radiodevices.ru%2Fesr%2Fesr4.htm&act=urlIt turned out that this meter had a range of advantages over the other one's and Bob Parker's original design.
The main improvements are:
- DIL socket installed for testing new or desoldered caps (a very simple, but IMHO the most important advantage)
- normal test probes, no crocodiles, these are VERY clumsy to work with
- also measures capacity
- clear LCD display, no power draining LED's and following this they could use:
- two CR2032 standard button batteries. The battery voltage is measured and indicated every time you turn it on. This makes sure the battery is never dead when you need it...and the CR batteries will last VERY long.
- beeper indicating bad or suspicious caps
- internal calibration
- much faster measuring
- can detect a shorted cap (this is rare, but the others give an erroneous on these)
- can measure up to 60000 uF, no other device can do this, so this makes it possible to test Big Blue's !
There are more advantages, but check the docs/website for that.
Anyway...before I start, one word: Mike from Radiodevices.ru told me that he continuously had problems in getting parts from China (mainly the LCD I think). He now has a couple of finished meters on stock though.
The price of the meter is , which is very favorable for people like me who are from Europe and use the Euro. The price INCLUDES world-wide shipping.
About the shipping: the device arrived in a plastic bag with some bubble foil wrap around it and a printed out version of the (excellent, perfect ENGLISH !) manual (also downloadable here:
http://www.radiodevices.info/esr/esr4_en.pdf.
Now, since the shipping cost is included I can understand that radiodevices.ru tries to keep costs low by using an envelope, but I have a feeling this is a bit of a risk to the device. A tiny box, or some card-board protection around the device would be much preferred. The reason I think so is that the meter showed some tiny spots on the edge of the LCD display when it arrived:
[Insert pic]
I e-mailed them about it. I think it's acceptable as it is now (under some light it's hardly visible, not sure if it is the LCD itself or something that covers it) but not if the dark spots will expand over the LCD in the future....
I was a bit surprise about the test-leads. The one's pictured on the site (so top picture) looked a bit flimsy. The quality of the test leads is pretty essential for this devices, since contrary to regular DVM's there is a 100kHz signal going through them.
However, the test leads turn out to be of excellent quality, lead and tip are one piece and there are even protective covers for the sharp ends.
Calibration.
To compensate the resistance of the test-leads themselves, you should calibrate before use.
This is done by putting both leads TIGHTLY on the 4th and 5th position of the DIL socket on the LEFT side and then turning on the meter. It will show CALIBR WAIT. Do NOT move the test probes at that time. Then CALIBR DONE will be showed. Keep the test leads in position though and check the reading, it should be no more than 0,01
If you're going to do measurements on the DIL socket with new or desoldered caps, the calibration should be done on the RIGHT side of the DIL socket. Simply use a piece of wire (cut off resistor lead f.i.) to short the top and bottom pins and then calibrate as above.
EDIT: The spots in the LCD were actually on the perspex screen IN FRONT OF the LCD screen....I removed it, no more spots ! 


