Author Topic: The Gauntlet Legends - Mame/Dreamcast project ...and finally back to GL :-)  (Read 157368 times)

DarthNuno

  • Administrator
  • ArcadeLifeStyler'
  • *****
  • Posts: 11707
  • Singe's castle
    • View Profile
    • Dragon's Lair Fans / Arcade LifeStyle
The Gauntlet Legends / Mame Daphne Project - in progress...
« Reply #15 on: December 09, 2004, 09:26:02 PM »
7th of december 2004 :

I got my latest Happs order :

- 1 x Ultimate Joystick 8 way Black
- 1 x Ultimate Joystick 4 way Black
- 1 x Universal Joystick 8 way Black
- 1 x Super Joystick 8 way Black
- 1->4 "players" startbuttons
- various conn. term ...


At this time, I still don't know what Joysticks setup I'll use to build my control panel... I'll wait to have a trackball to start the CP design...
« Last Edit: April 03, 2012, 06:52:11 PM by DarthNuno »

DarthNuno

  • Administrator
  • ArcadeLifeStyler'
  • *****
  • Posts: 11707
  • Singe's castle
    • View Profile
    • Dragon's Lair Fans / Arcade LifeStyle
The Gauntlet Legends / Mame Daphne Project - in progress...
« Reply #16 on: December 18, 2004, 08:57:55 AM »
18th of December 2004 :


Just received my latest ULTIMARC order :

- Opti-Pac / USB version
- Trackball + mounting plate


Now, I'll start the custom control panel design... :roll:

to be continued...
« Last Edit: April 03, 2012, 06:52:34 PM by DarthNuno »

DarthNuno

  • Administrator
  • ArcadeLifeStyler'
  • *****
  • Posts: 11707
  • Singe's castle
    • View Profile
    • Dragon's Lair Fans / Arcade LifeStyle
The Gauntlet Legends / Mame Daphne Project - in progress...
« Reply #17 on: December 19, 2004, 06:59:34 PM »
19th of december 2004 :

Well, it's time to work on the Control Pannel...

I'll use the Dark Legacy's plexiglass to draw the pattern on the piece of wood :


... the pattern to cut :


Be the way, it's is the first time I'm using that cutting tool  :roll: , so please be indulgent  :oops:  

In order to cut perfectly in line, I've used another wood board, as a guide :


The CP edges must be curved, so here we go :


I hope this wood board will be strong enough to support T-molding  :roll:


Done  :P  :P  :P  :


Just to test the size of an happs pushbutton hole  8) --> 28mm is PERFECT


Still lot of work, but for my first wood working, I'm OK with the result  :roll:  :wink:  :twisted:


to be continue...
« Last Edit: April 03, 2012, 06:53:32 PM by DarthNuno »

DarthNuno

  • Administrator
  • ArcadeLifeStyler'
  • *****
  • Posts: 11707
  • Singe's castle
    • View Profile
    • Dragon's Lair Fans / Arcade LifeStyle
The Gauntlet Legends / Mame Daphne Project - in progress...
« Reply #18 on: December 23, 2004, 09:47:11 PM »
22th of december :

In order to fix Happ joysticks & install T-Molding, I 've bought a brand new router :


Let's draw the joystick pattern...


cutted...


...and use the router for doing this :


Of course I do that on a common wood board, I've to learn how to use properly the router  :roll:  :roll:

The pattern is a little bit too big, I'll do an another one to match exaclty the happ'...

I hope the wood I'm using will be strong enough...


View from the side


Ok, I've to practice a little the router before starting to work the real control panel  :roll:  8)  :roll:  8)

... to continue  :roll:

DarthNuno

  • Administrator
  • ArcadeLifeStyler'
  • *****
  • Posts: 11707
  • Singe's castle
    • View Profile
    • Dragon's Lair Fans / Arcade LifeStyle
The Gauntlet Legends / Mame Daphne Project - in progress...
« Reply #19 on: December 26, 2004, 10:01:50 PM »
26th of december :

OK, I got my new happ trackball  :roll:  ...

The Happ trackball was my first choice, but I got some trouble to get it... But now I have one, so I can start to work on the control panel for real  :twisted:  ... Dunno what to do with the Ultimarc trackball + optipac  :roll:  :?:  Ebay or maybe for an another project  :?: ...

Anyway, here's my homemade "nude" control panel , not fixed but right in place :


I'm using a sheet of paper as template  to draw the trackball's border to cut...


... then I draw -according the pattern from the sheet of paper- directly on the backside of the panel :


I fix the board before cutting the pattern :


Cutted ...


... and fixed ... Does it will be right in place  :roll:  :?:  :roll:  :?:


YEAH  :D It's perfect  :roll:  I rule (...until now...cross the fingers...)  8)  8)  8)


OK, time to fix the Spinner now

Remember, few month ago i bought the *famous* Tornado Spinner  :idea:  :roll:  Well, it's time to use it now  :twisted:


Very easy, just one hole from the top, and 4 from the back...


...Et voilà :


 8) I'm going to London this coming week for the new year, so see you next year for the next parts  :roll:  :wink:   8) ...

... so :


HAPPY NEW YEAR 2005

DarthNuno

  • Administrator
  • ArcadeLifeStyler'
  • *****
  • Posts: 11707
  • Singe's castle
    • View Profile
    • Dragon's Lair Fans / Arcade LifeStyle
The Gauntlet Legends / Mame Daphne Project - in progress...
« Reply #20 on: January 12, 2005, 07:19:54 PM »
My forum has been hacked, and my latest backup was  until this WIP step... So I'm posting again the story , but with less explanation :?  
@#*? Hackers  :evil:  :evil:  :evil:

DarthNuno

  • Administrator
  • ArcadeLifeStyler'
  • *****
  • Posts: 11707
  • Singe's castle
    • View Profile
    • Dragon's Lair Fans / Arcade LifeStyle
The Gauntlet Legends / Mame Daphne Project - in progress...
« Reply #21 on: January 12, 2005, 07:47:43 PM »
3th of January 2005 :

It's time to place the first joystick...


...and use the *brand new* router on the real panel  :roll:


This pattern size allow me to plug any Happscontrols Joystick  :)


I don't cut to deep, because the wood board doesn't seems to be the strongest one... :roll:


The joystick's base fits perfectly  8)


Now, the central hole for stick.


I use the same hole size than the happ's push button : 28mm


Done ...


... with the stick fixed  8)


Side view...


... by the way this one is an happ's super joystick 8 ways...


As easy as my ABC, after all  :roll:  :wink:


to be continue...

DarthNuno

  • Administrator
  • ArcadeLifeStyler'
  • *****
  • Posts: 11707
  • Singe's castle
    • View Profile
    • Dragon's Lair Fans / Arcade LifeStyle
The Gauntlet Legends / Mame Daphne Project - in progress...
« Reply #22 on: January 12, 2005, 08:19:06 PM »
6th of January 2005 :

Let's continue with the 2nd joystick


I'm using of course the same pattern than the first one...


...exactly the same actions than the first joystick  :P


Done  8)


Now, the BIG choice :  :?: Where to place buttons  :?:
 :idea:  Here's how I'm testing different combinaison, in order to see how it could be look  :?:


...I've to be as precise as possible   :roll:  ... by the way, this second joystick is an happ's Utlimate 8ways


Also added an happ's Universal 4ways joytick in central position, in order to master 4ways games such PacMan, Frogger, ...  :wink: It can be also used as third player 'stick  :roll:


To be continue...

DarthNuno

  • Administrator
  • ArcadeLifeStyler'
  • *****
  • Posts: 11707
  • Singe's castle
    • View Profile
    • Dragon's Lair Fans / Arcade LifeStyle
The Gauntlet Legends / Mame Daphne Project - in progress...
« Reply #23 on: January 12, 2005, 09:36:17 PM »
9th of January 2005 :

Add more buttons... found a better location for spinner :


...now the spinner is fixed at his definitive place  :!:


Add few more buttons... again  :!:    :lol:


Add maintenance buttons under the control pannel :


Same view but under the control panel :


Add one more button on the right :


General view of the control pannel :


All the stuff are now in place...


...and it looks nice isn't it  :wink:   :roll:   :twisted:
Of course I'll change the push buttons colors  8)


Start to wire the common ground for all buttons / joystick...


... and fix the Ultimarc IPAC4 on the board.


...wiring...


...wiring...again...  :roll:


What a mess  8) I'll have to unwire everthing in order to paint properly the control panel... So I'll fix all the wires much properly after installing t-molding / painting process...


Et voilà  8)


To be continue...

DarthNuno

  • Administrator
  • ArcadeLifeStyler'
  • *****
  • Posts: 11707
  • Singe's castle
    • View Profile
    • Dragon's Lair Fans / Arcade LifeStyle
The Gauntlet Legends / Mame Daphne Project - in progress...
« Reply #24 on: February 13, 2005, 10:55:26 AM »
13th of  february :

Not a lot of hardware work on the cab's these days... I'm still waiting for T-Molding [ Why odering oversea is so long...  :cry:  )

few additions anyway :

I've fixed the control panel to the cab partialy.

Before :


Closer, after fixing the first screw :


Done :


Once I get the T-Molding, I'll remove all joysticks/buttons to add it, than I'll put 2 others screws to fix correcly the panel...

Next, I choose an easy access location for the DVD Drive :


and install DAPHNE emulator  :P

Space Ace attaction mode running :


The sound coming from my first speaker hack wasn't nice  ( too loud and noisy ) in middle/high volume position, so I remove the orginal Gauntlet Legends speaker and replace them by better Phillips speaker. I also add a CAMBRIDGE Bass Power amp / LoudSpeaker 2.1 inside the cabinet :


The sound now fantastic, I can use that cab now as a JukeBox player  :wink:

...stay tuned  :roll:

jeston

  • Jr. Member
  • *
  • Posts: 4
    • View Profile
    • http://www.toudyfighter.fr.st
The Gauntlet Legends / Mame Daphne Project - in progress...
« Reply #25 on: February 22, 2005, 12:51:10 AM »
rien a dire, elle a trop la classe maintenant, manque plus que l overlay sur le panel, mais sinon whoaaa, j m attendais pas a c que ca donne si bien.
Du travail tres propre :) bravo

Codex

  • Jr. Member
  • *
  • Posts: 28
    • View Profile
The Gauntlet Legends / Mame Daphne Project - in progress...
« Reply #26 on: February 26, 2005, 05:13:19 PM »
C'est clair, du travail de pro. Faut être motivé aussi. :)

@+

DarthNuno

  • Administrator
  • ArcadeLifeStyler'
  • *****
  • Posts: 11707
  • Singe's castle
    • View Profile
    • Dragon's Lair Fans / Arcade LifeStyle
The Gauntlet Legends / Mame Daphne Project - in progress...
« Reply #27 on: February 27, 2005, 04:38:54 PM »
Quote from: "jeston"
rien a dire, elle a trop la classe maintenant, manque plus que l overlay sur le panel, mais sinon whoaaa, j m attendais pas a c que ca donne si bien.
Du travail tres propre :) bravo


Merci Jeston... Mais y a vraiment rien de compliqué... faut juste prendre son temps et être patient ... toutes les pieces utilisées viennent des states... stay tuned, la borne est finie je pense... je poste bientot les tofs  :twisted:

MErci pour tes commentaires  :wink:

DarthNuno

  • Administrator
  • ArcadeLifeStyler'
  • *****
  • Posts: 11707
  • Singe's castle
    • View Profile
    • Dragon's Lair Fans / Arcade LifeStyle
The Gauntlet Legends / Mame Daphne Project - in progress...
« Reply #28 on: February 27, 2005, 04:43:03 PM »
Quote from: "Codex"
C'est clair, du travail de pro. Faut être motivé aussi. :)

@+


Yo Codex  :P

Pro ? Non pas du tout  :roll:  J'te promet n'avoir jamais touché une scie sauteuse de toute la vie, et encore moins avoir entendu parler d'une "défonceuse" jusqu'à il y a deux mois...  :oops:
Le travail du bois est quelque chose de nouveau pour moi, et la seul motivation a été la construction de mon 'custom' control panel  :roll:
Mon prochain boulot sera la construction de A à Z d'une borne Dragon's Lair, et là je sens que je vais m'amuser  :?  8)

A+++

DarthNuno

  • Administrator
  • ArcadeLifeStyler'
  • *****
  • Posts: 11707
  • Singe's castle
    • View Profile
    • Dragon's Lair Fans / Arcade LifeStyle
The Gauntlet Legends / Mame Daphne Project - in progress...
« Reply #29 on: February 27, 2005, 06:12:21 PM »
27th of february... this is it  8)

Well, after more than five month working on this project... this is it :  The final step  :wink:

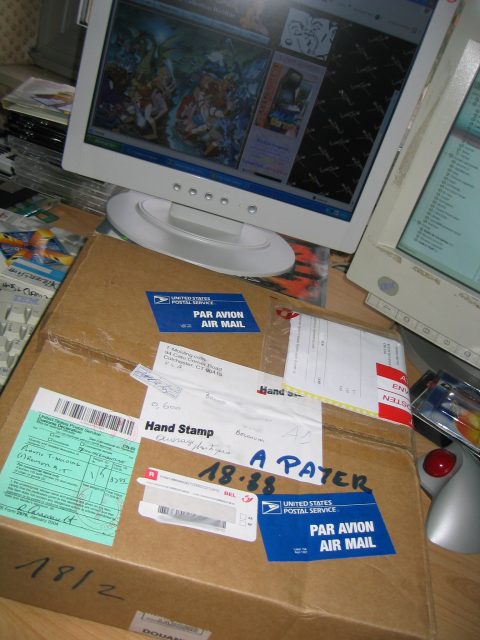
I was waiting for my yellow T-Molding & special router head for doing the job since TWO month !!! Order items from US begin to  be very long ... F@#! custom #%&@ !!!!

Ok here's finally the stuff from T-Molding :


Inside the box : T-Molding & Router's head tool for doing the job :


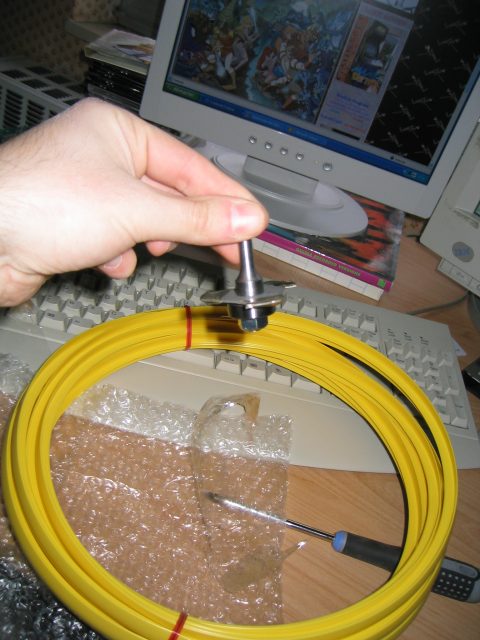
Note that this T-Molding is exaclty the same size & color than the original one from the Gauntlet Legends cab...

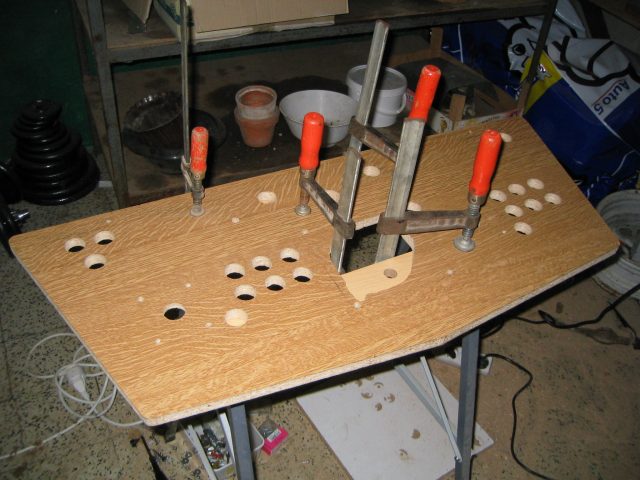
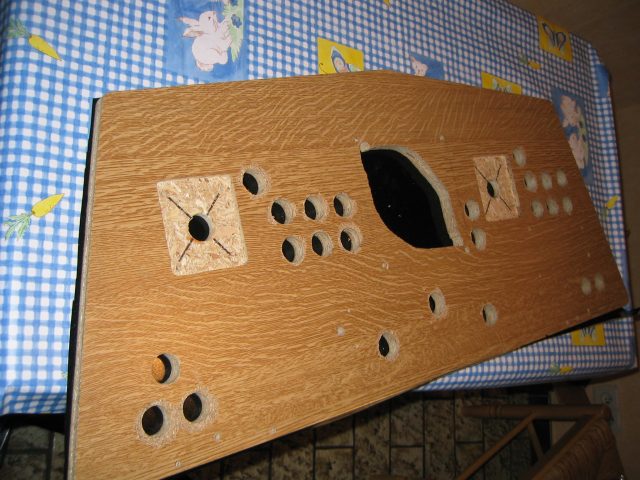
The boring part : remove EVERYTHING on the control panel


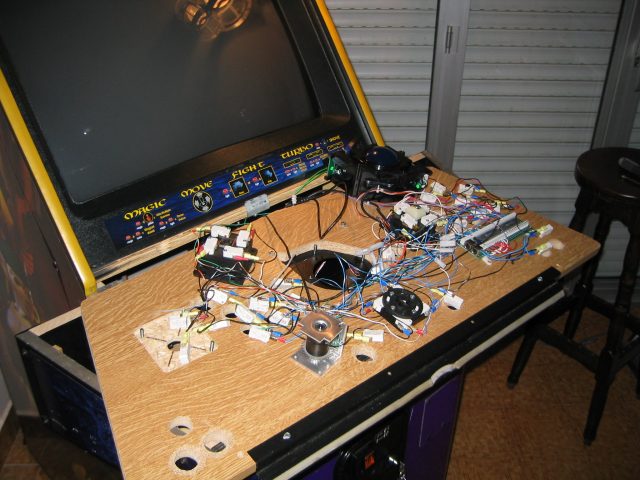
... one hour later, the CP is naked .


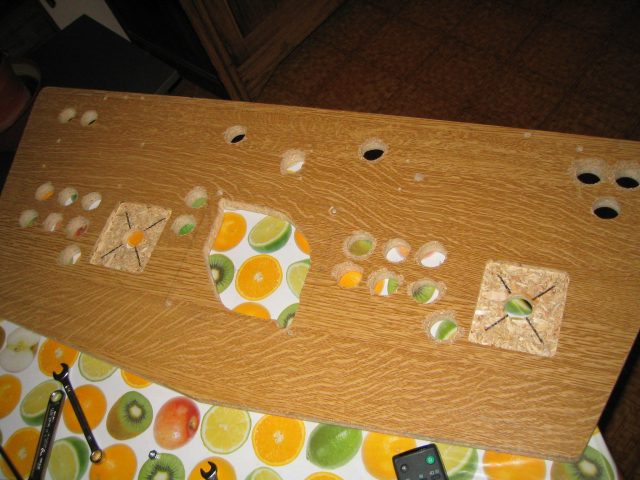
Before using the Router, fix AS STRONG AS POSSIBLE the control panel, it can't move while the 'routing' process ! Caution ! 8)


Here's THE tool, ready to go :p :


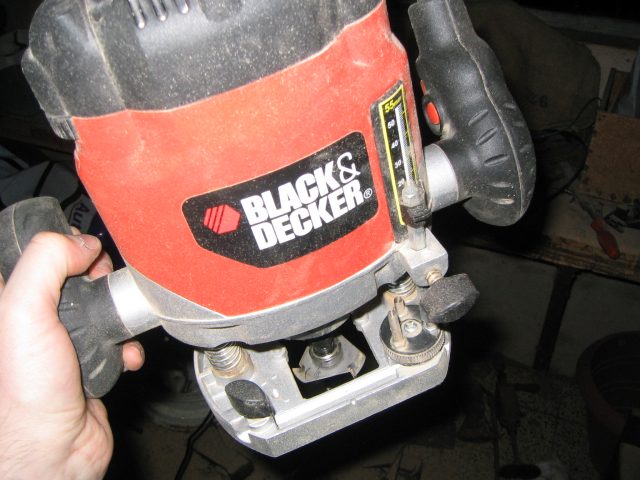
Using a router was the most frightening part for me... I  mean it allows NO mistake, and it's a dangerous tool IMO ... But I  did the job :roll:  :P  


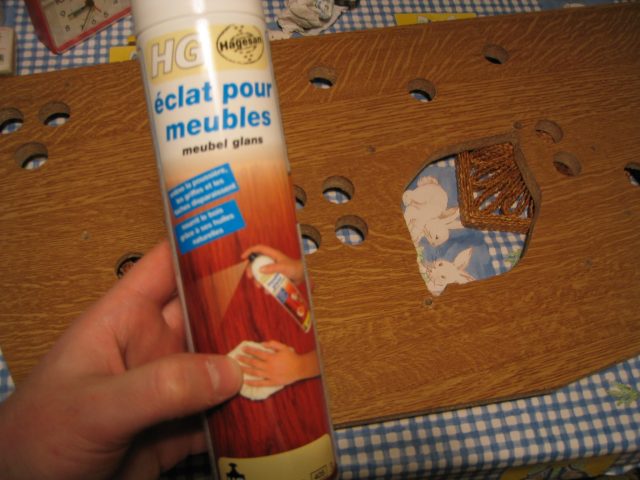
Ok, now before to fix the CP overlay, the wood surface need to be as clean as possible. Here's what I'm using to clean the wood :


The control panel is ready for the overlay sticker  :idea:


Take you time to apply a vinyl overlay with a such size...


... to avoid air bubbles.

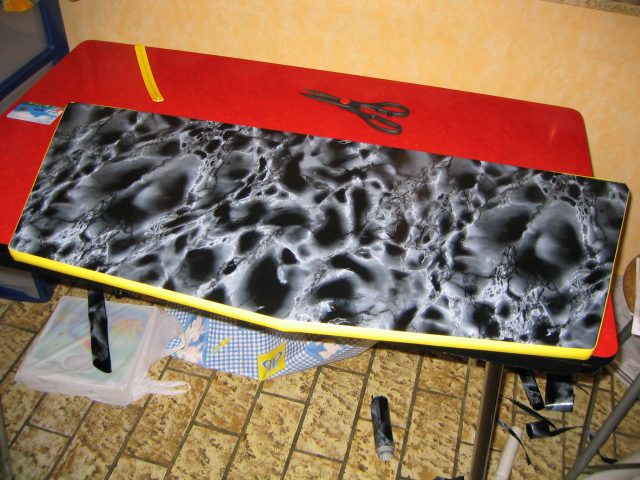
Ok, now fix the T-Molding :
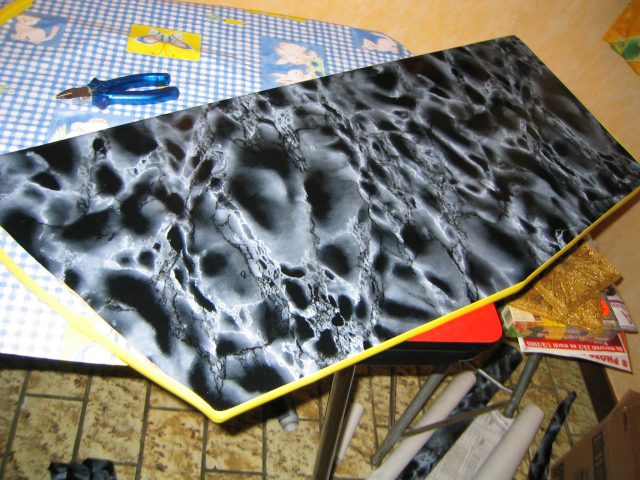

Done  :


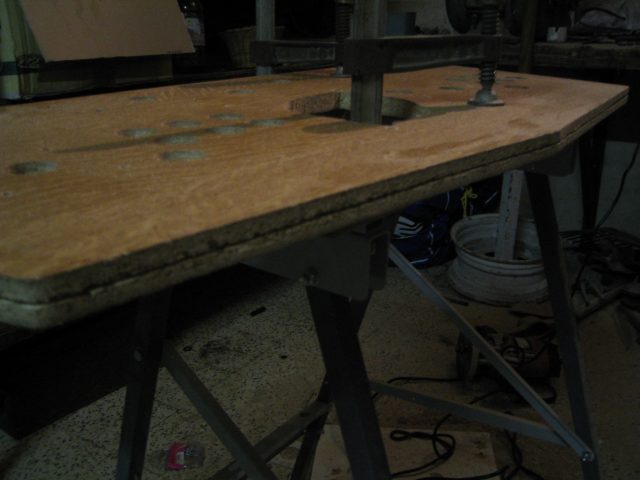
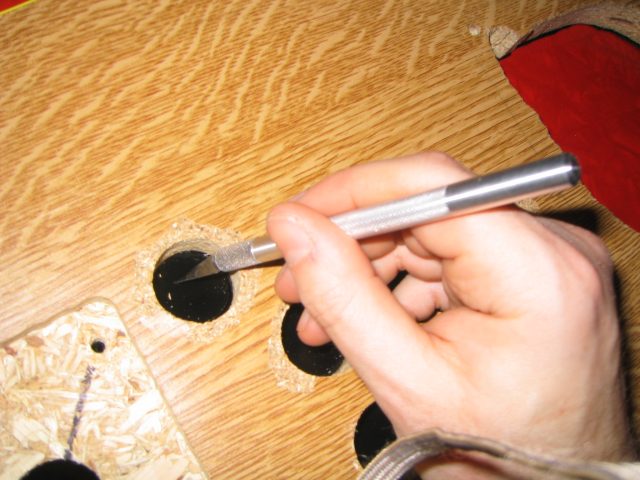
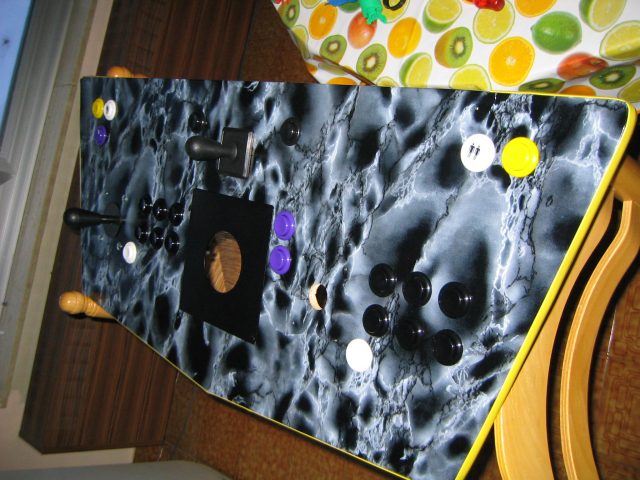
From the control panel back,  cut carefully the holes :


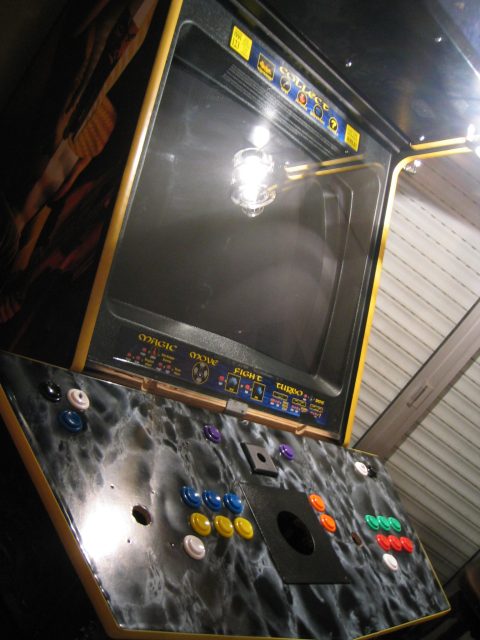
I was so hurry to show how it looks on location, so here's a little preview
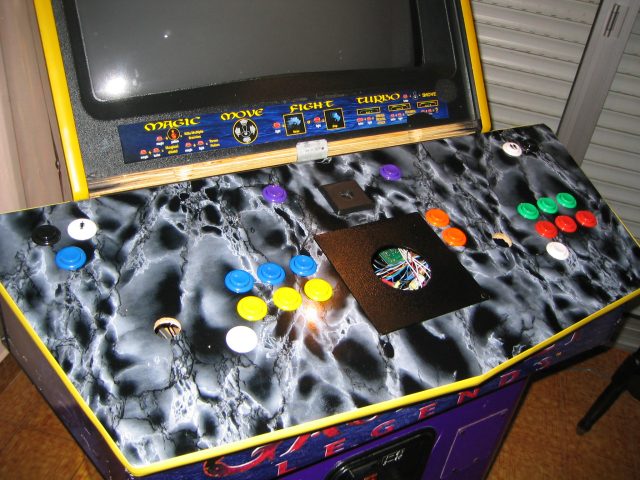
 :roll:  :roll:  :roll:


...another one :


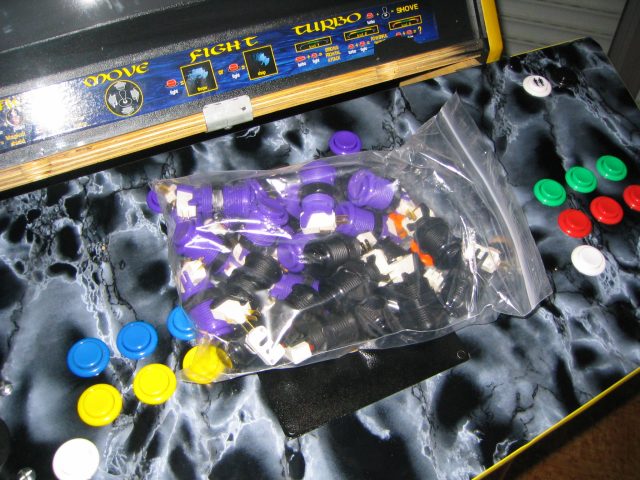
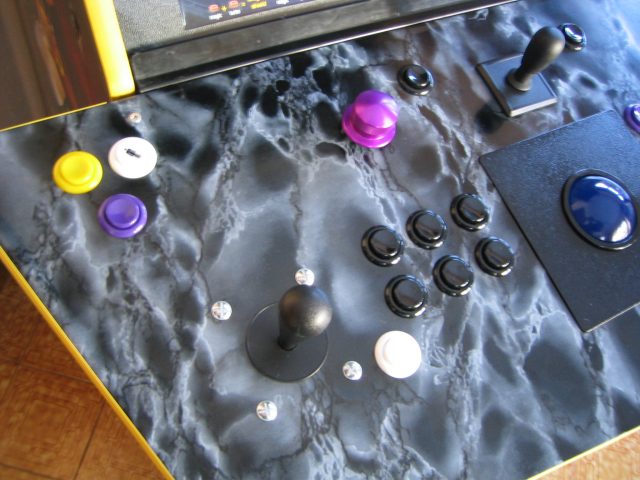
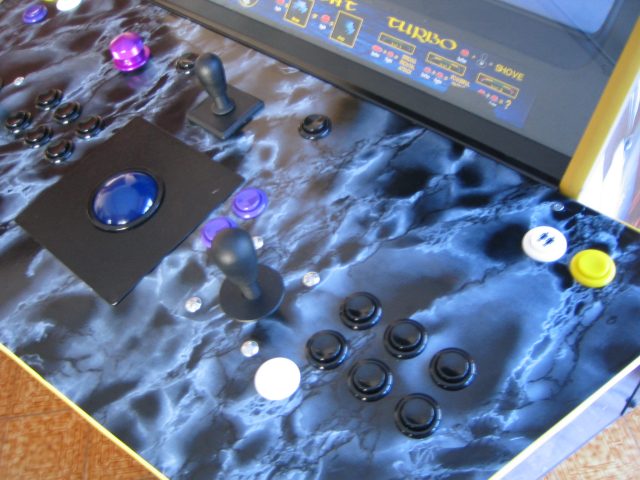
Ok, it's time to fix the definitive push buttons, with the right colors  :P


To fix back the joysticks and other stuff, I'm using two chairs :


... a boring part : to wires -once again- all the push-buttons / joysticks / spiner & trackball : 90 minutes  :evil:

But HERE's the result :


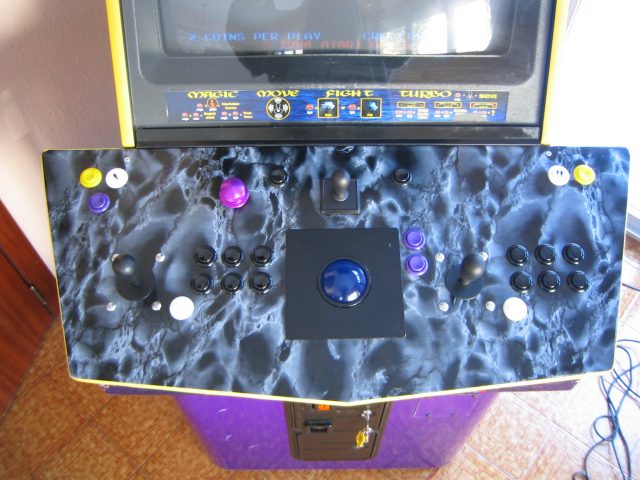
I'm really happy with that cab now, and I think I can play some games now ;-)

REMEMBER : I can revert back the Gauntlet Legends Mame/Daphne cab to the original Gauntlet Legends cab... I didn't modify any original items from that dedicated cab  :wink:  

I'll list the hardare parts / tools / software used for this project... And maybe  start to work on the GameCube integration  ... so stay tuned  8)  8)  8)  8)