Author Topic: Restoration - SAGAIA  (Read 19668 times)

petieken

  • Member
  • **
  • Posts: 377
  • Belgium
    • View Profile
    • My VAPS Entry
Restoration - SAGAIA
« on: December 21, 2009, 02:42:46 PM »
After the almost-failed roadtrip (https://www.dragonslairfans.com/smfor/index.php?topic=1193.0) comes the cleaning up and restoration of the Sagaia cabinet. This is my first cabinet ever, so forgive me if there are a lot of questions which are obvious to you guys, but they aren't to me ;)

First, let's get rid of that MDF plate in the front and see what huge/small hole/damage is underneath

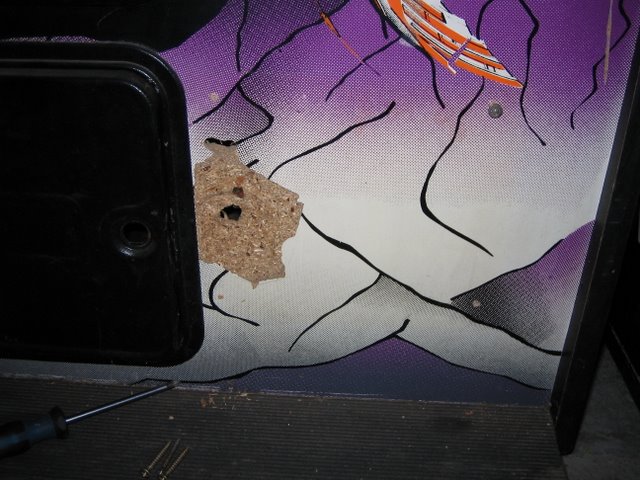
Probably a security bar was once mounted there, which isn't removed very carefully... :( Hmmmm, I've currently got no idea how to restore the artwork. I will tape off the good artwork, and fill up the hole with that wood filler like I've seen on a restoration on this forum.


Next inspection, coin door :arrow:

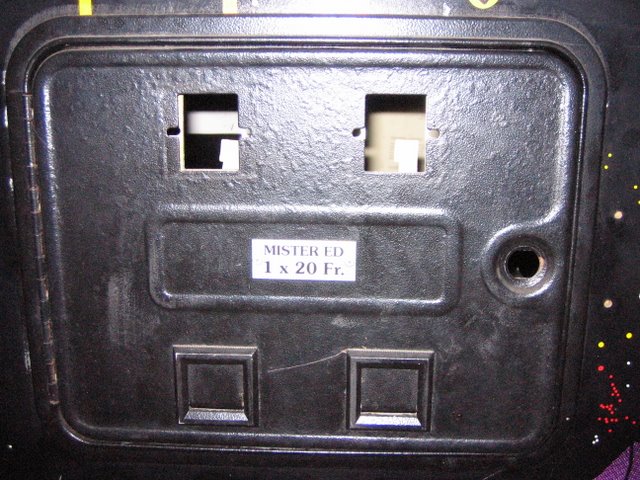
As you can see, there are rust bubbles under the paint (sanding and repainting). Coin entry, mechanism and lock are missing. The lock from the door under is also missing.
I checked out this site to buy new locks, but there are different sizes available: 17, 23 & 28. The rear plate lock I had to drill open is 23mm. What is the standard size of a coin door lock, or how do I measure which one I need? For the coin mechanism and entry, is this a standard size, and where do I find it? I can find the mechanisms for each currency everywhere, but not the entry module...


Let's unscrew the rear monitor plate

Here's one monitor, a Wells Gardner (K7000?). You can also see the half mirror from here, altough it doesn't look like a window or mirror with all that dust on it :).


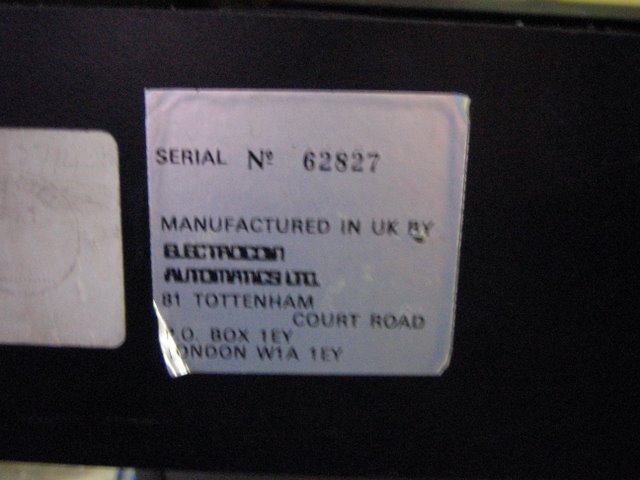
Look, the serial number sticker is still present :)


After drilling open the back door lock, we find this:

A ballpoint pen, a spare "Mister Ed" sticker, a keyhanger,... ;D
I noticed earlier that the service switch was missing, now here it is! It's hanging between the power supply cables on the right side (with the red wire). There is a paper stapled on the inside of the backdoor reading 'KINEPOLIS BXL'. So if anyone's ever seen a Sagaia at Kinepolis Brussels back in the day, this is the one!


Here's the pcb

Looks very clean for it's age :) And it's still working perfectly 8)


After removing the front glass and half mirror, we see the front of the first monitor :arrow:

As you can see, a ton of dust and lots of screen burn. Although the camera makes it look even more worse than it is :D.


The horizontal monitor used to be here (sorry, forgot to take picture when it was still in), the vertical monitor is already removed too.


Here is the control panel and instructions cleaned up.

I still need something stronger to clean the edge of the cp, I didn't get that black stuff off. I'm going to remove the joysticks and buttons too to give them a good clean.


Here's supposed to be a picture of the cab cleaned up with the mirror and the glass all shiny, but the battery of my camera died. :(


To be continued...
Wanted: Cadillacs and Dinosaurs CPS1 Q-Sound pcb | SegaSonic The Hedgehog Art & instruction set

ckong

  • ArcadeLifeStyler'
  • ***
  • Posts: 3177
  • The Netherlands
    • View Profile
Re: Restoration - SAGAIA
« Reply #1 on: December 21, 2009, 04:56:01 PM »
That CP is still in really good shape. What did you use to clean it? I often first use water and soap, and then give it a good clean with scratch removal polish, like Commandant which is used for cars. You will get rid of most, if not all stains (as long as it isn't sigaret burns).

Front artwork will be though. It's of course no problem to fill and egalise the hole and wood damage (I use this: http://www.onlinebouwmarkt.nl/winkel/view_product.php?product=HOUV55GQ13
It's very easy to apply and it sands also very easy. If you are going to sand, always goe from a low correl, to a high correl number. how higher the correl, the more smoother it gets. I mostly end up wtih 400 which is more than good enough.

But it will be difficult to find matching front artwork, Repro artwork is not available as far as I know. Best thing to do is perhaps get a colormatch of the surrounding area (very light purple) and paint the repaired wood with that color, and then just paint yourself matching black stripes. This is of course cosmetically not the best solution.

How did you drill the lock open? I have to do it myself on a cab, but am not sure how to do it.

I lover the internals of this cab, lot's to see and a special double monitor setup. Great.

petieken

  • Member
  • **
  • Posts: 377
  • Belgium
    • View Profile
    • My VAPS Entry
Re: Restoration - SAGAIA
« Reply #2 on: December 21, 2009, 06:03:27 PM »
I cleaned the cp with this:

I was cleaning the mirror and front glass and continued to use it to clean the cp ;D I know I should use something stronger to clean it, but I still need to take out the buttons and joysticks to clean them anyway. Those joysticks really need to be lubricated. P1 joystick doesn't even center itself, when you pull down it only goes back a little and stays activated in down position :D

I was thinking the same thing for the artwork, fill it, sand it, paint it (with colormatch), and then hand paint the black stripes on it. I don't think a reproduction will see the light of the day anytime soon, because it's a lot of work to vectorize this complex artwork. :(

It was the first time I drilled open a lock too, I started with a small drill (I think 4mm) and gradually used bigger drills until the lock broke. Hint: Use lots of force to hold the drill, once I reached the tumblers (around 8mm drill) the drill got stuck and I was hit in my ribs with the handle of the machine. :-[

There are more pics of the internals (mostly wiring) here: http://picasaweb.google.be/kevinpetit83/SagaiaT2?authkey=Gv1sRgCPqCipCcz6bGIQ&feat=directlink
I took these pictures because we had to disassemble the whole cab to bring it upstairs, and then reassemble it. The cab is actually bigger than the official specs... I also discovered a lot of screws hidden in the complex side artwork by doing this :( I didn't put them back in but the cab is a bit wiggly without them, the operator probably screwed them in to solve the wiggly problem. I'm going to buy L-shaped brackets and reinforce the cab from the inside, which is a lot cleaner and neat looking than those ugly screws in the artwork. OEM spec, the cab only has screws on the bottom sides and behind and above the monitor on the rear. Front side, cp,... are only connected with 'deuvels' (I don't know the english name for this)  :arrow:

L-brackets will certainly be the best solution for extra sturdiness and 'good looks' :)
Wanted: Cadillacs and Dinosaurs CPS1 Q-Sound pcb | SegaSonic The Hedgehog Art & instruction set

ckong

  • ArcadeLifeStyler'
  • ***
  • Posts: 3177
  • The Netherlands
    • View Profile
Re: Restoration - SAGAIA
« Reply #3 on: December 21, 2009, 06:39:44 PM »
Yes, I see the screws, they are just on the edges of the artwork, aren't they? Although I am not a big fan of using L-brackets in an original cab, a wiggly cab is also not good. Or you could replace the screws with phillips screws ( see step 8 at http://www.instructables.com/id/When_a_Phillips_is_not_a_Phillips/ ) and place screw caps on them. Screw caps are tiny plastic caps which fit in and over the head of phillips screws. That way you don't see the screw but a nice clean cap. They have them in black and white, at least where I got some at a large do-it-yourself store.

Thanks for the tip to drill the lock. I hope you didn't hurt yourself too much.

I also found a nice replacement mirror if yours gets broken:

http://www.nentnv.com/antiek_images/antieke-spiegels-bij-nvNent-1.jpg
« Last Edit: December 21, 2009, 06:52:12 PM by ckong »

petieken

  • Member
  • **
  • Posts: 377
  • Belgium
    • View Profile
    • My VAPS Entry
Re: Restoration - SAGAIA
« Reply #4 on: December 21, 2009, 06:55:00 PM »
I prefer the L-brackets over the screws that aren't even in a straight line, some of them aren't even in the wood. They were next to the board instead of in it. And the L-brackets won't be visible anyway, and I'm only gonna need about 6 of them.
What are other people's opinions on the L-brackets or screws with caps?

I didn't hurt myself too much, after a few minutes the pain was over ;)
Wanted: Cadillacs and Dinosaurs CPS1 Q-Sound pcb | SegaSonic The Hedgehog Art & instruction set

ckong

  • ArcadeLifeStyler'
  • ***
  • Posts: 3177
  • The Netherlands
    • View Profile
Re: Restoration - SAGAIA
« Reply #5 on: December 21, 2009, 08:59:19 PM »
If you use the L-brackets, you should at least fill the screw holes. But I'm sure that you will do that.

petieken

  • Member
  • **
  • Posts: 377
  • Belgium
    • View Profile
    • My VAPS Entry
Re: Restoration - SAGAIA
« Reply #6 on: December 21, 2009, 09:09:04 PM »
If you use the L-brackets, you should at least fill the screw holes. But I'm sure that you will do that.

Yes, that was the plan :)
Wanted: Cadillacs and Dinosaurs CPS1 Q-Sound pcb | SegaSonic The Hedgehog Art & instruction set

Bods

  • Jr. Member
  • *
  • Posts: 73
    • View Profile
Re: Restoration - SAGAIA
« Reply #7 on: December 21, 2009, 09:39:19 PM »
Wow another Sagaia cab

I only seen one over in UK

You guys seem to have some nice machines over there. We have to keep pinching the odd ones  :wink: for UK

I have a board for one of these, jamma pinout so I wired up and it works :)

Cheers

Chris

Etienne MacGyver

  • ArcadeLifeStyler'
  • ***
  • Posts: 7611
  • The Netherlands
    • View Profile
Re: Restoration - SAGAIA
« Reply #8 on: December 22, 2009, 08:16:46 AM »
How did you drill the lock open? I have to do it myself on a cab, but am not sure how to do it.

Maybe you could try to pick the lock first ?

after its open , its just a matter of replacing the lock with a new one..

is it the coindoor , or the back ?

If its the coindoor, you could crawl through the cab to the coindoor from the back  ;D

ckong

  • ArcadeLifeStyler'
  • ***
  • Posts: 3177
  • The Netherlands
    • View Profile
Re: Restoration - SAGAIA
« Reply #9 on: December 22, 2009, 11:28:19 AM »

Maybe you could try to pick the lock first ?

A long time ago I have sworn not to do that anymore.

METALHEAD

  • Jr. Member
  • *
  • Posts: 45
    • View Profile
Re: Restoration - SAGAIA
« Reply #10 on: December 22, 2009, 10:27:11 PM »
Not that I am a woodworking expert, but a buddy of mine is.  Just as a hint, when a screw hole is stripped out, take wooden toothpicks and shove them in there and break them off even with the surface.  You can now put the screw back in and it gets a VERY good bite.  As for the wooded pegs, I call them Dowels :)

level42

  • ArcadeLifeStyler'
  • ***
  • Posts: 13555
  • Ridderkerk, arcade capital of Europe !
    • View Profile
    • Arcade 42
Re: Restoration - SAGAIA
« Reply #11 on: December 22, 2009, 11:01:55 PM »
Not that I am a woodworking expert, but a buddy of mine is.  Just as a hint, when a screw hole is stripped out, take wooden toothpicks and shove them in there and break them off even with the surface.  You can now put the screw back in and it gets a VERY good bite.  As for the wooded pegs, I call them Dowels :)
Clever idea.

The funny thing is that the Dutch word is "deuvels", so I bet dowels could well stem from our language. This is what OS X's dictionary says about it:

dowel |ˈdouəl|
noun
a peg of wood, metal, or plastic without a distinct head, used for holding together components of a structure.
dowel
verb ( doweled, doweling ; Brit. dowelled, dowelling) [ trans. ]
fasten with a dowel or dowels.
ORIGIN Middle English : perhaps from Middle Low German dovel.

petieken

  • Member
  • **
  • Posts: 377
  • Belgium
    • View Profile
    • My VAPS Entry
Re: Restoration - SAGAIA
« Reply #12 on: December 23, 2009, 10:54:34 AM »
Not that I am a woodworking expert, but a buddy of mine is.  Just as a hint, when a screw hole is stripped out, take wooden toothpicks and shove them in there and break them off even with the surface.  You can now put the screw back in and it gets a VERY good bite.  As for the wooded pegs, I call them Dowels :)

Good tip, I'll remember that for the future. With this cab I can't use this trick, all the screw holes are still ok. The problem is that the arcade operator decided to put screws in the artwork to reinforce the cab a bit. I removed the screws again and it isn't as wobbly as before, I found out that it's the CP that adds a lot to the sturdiness of the cab. When open, it's wobbly, when closed, everything ok :)
Wanted: Cadillacs and Dinosaurs CPS1 Q-Sound pcb | SegaSonic The Hedgehog Art & instruction set

petieken

  • Member
  • **
  • Posts: 377
  • Belgium
    • View Profile
    • My VAPS Entry
Re: Restoration - SAGAIA
« Reply #13 on: December 23, 2009, 04:02:53 PM »
I want to take care first of the joysticks and buttons, especially because P1 joystick really feels sloppy and doesn't center.

Let's dismount the joysticks

Hmmm, lots of dust, dirt, grime,... everywhere :ghost:

Opening them up:

More dirt :ghost: :ghost: and a rusty spring

After cleaning them in soapy water, I put some grease on the moving parts to ensure a smooth operation for the future :)


All cleaned up and lubricated now :arrow:

There's still a problem with one joystick, it still doesn't center... After close inspection I found that a part has been replaced with a home-made part :( I think these joysticks are a no-brand so I'll have to find replacement joysticks that look about the same (black balltop and black shaft). Because finding that small nylon piece will be impossible for a no-brand joystick.
As you can see, the dustwashers are both warped. I'll have to find replacements for those too.

Next, the buttons :arrow:

Again, the buttons are very dirty too :ghost:

After disassembling them I decide to give that ultrasonic cleaner a try that has been collecting dust for quite a while. You can see the water is already dirty after a few seconds:

This thing is perfect for cleaning inside the shaft and other places you can't reach by hand. After a few minutes, I take the buttons out and rinse away all the dirt, no sponge or brush needed :)

While the buttons are drying, I clean the contact points of the leafswitches with alcohol and a q-tip:

Now they're ready to operate for another 20 years :D

Buttons assembled and ready to go in the cabinet again :arrow:

The white buttons are slightly yellowed, but I can't really complain, I've seen worse than this :)


Next up: replacing all the electrolytic capacitors on both monitors' chassis
« Last Edit: December 23, 2009, 04:04:55 PM by petieken »
Wanted: Cadillacs and Dinosaurs CPS1 Q-Sound pcb | SegaSonic The Hedgehog Art & instruction set

petieken

  • Member
  • **
  • Posts: 377
  • Belgium
    • View Profile
    • My VAPS Entry
Re: Restoration - SAGAIA
« Reply #14 on: January 22, 2010, 05:32:28 PM »
No update on the restoration yet, but I received this yesterday :arrow:


It's the official Taito Darius Gaiden T-Shirt that had a limited production run last year in Japan ;D. I had to look around a bit because almost all shops were sold out (of course they are). Darius' HUGE BATTLE SHIPS 8)
Wanted: Cadillacs and Dinosaurs CPS1 Q-Sound pcb | SegaSonic The Hedgehog Art & instruction set